本文通过将图片和代码结合的方式,讲解 YOLOv8 的架构,目前仅介绍架构,对于每个组件的原理未加说明。
本文内容
文中术语简介
在视觉深度学习中,通常将模型分为 2~3 个组成部分:backbone、neck(可选) 和 head。
- Backbone(骨干网络)负责从输入图像中提取特征,将图像转化为具有丰富语义信息的特征表示。
- Neck(颈部,连接部)是一个中间层,用于对来自 backbone 的特征进行融合,以提升模型的性能。
- Head(任务头)是模型的最后一层,其结构会根据不同的任务而有所不同。例如,在图像分类任务中,我们通常会使用 softmax 分类器作为 Head,而在目标检测任务中,我们则可能会使用边界框回归器和分类器作为 Head。
YOLOv8 架构图
关于下面经典的架构图的简要说明:
- 图的上面部分为 YOLOv8 架构的概要图(包括 Backbone,Head)。YOLOv8 没有适用 Neck 这个概念,但其架构图中 Head 中类似 PANet 功能的部分也可以归为 Neck。
- 图右中位置 Detail 为各个组件的详细架构示例,另说明了不同模型大小的参数选择。
- 图左 + 图下部分,以分步的方式列出了完整的数据流。
- 每个框的右上角的数字为层的编号,可以和后面的示例输出 1 对照看。
可以看出,YOLOv8 Backbone 为 0~9 层,10~21 层为 YOLOv8 Head。
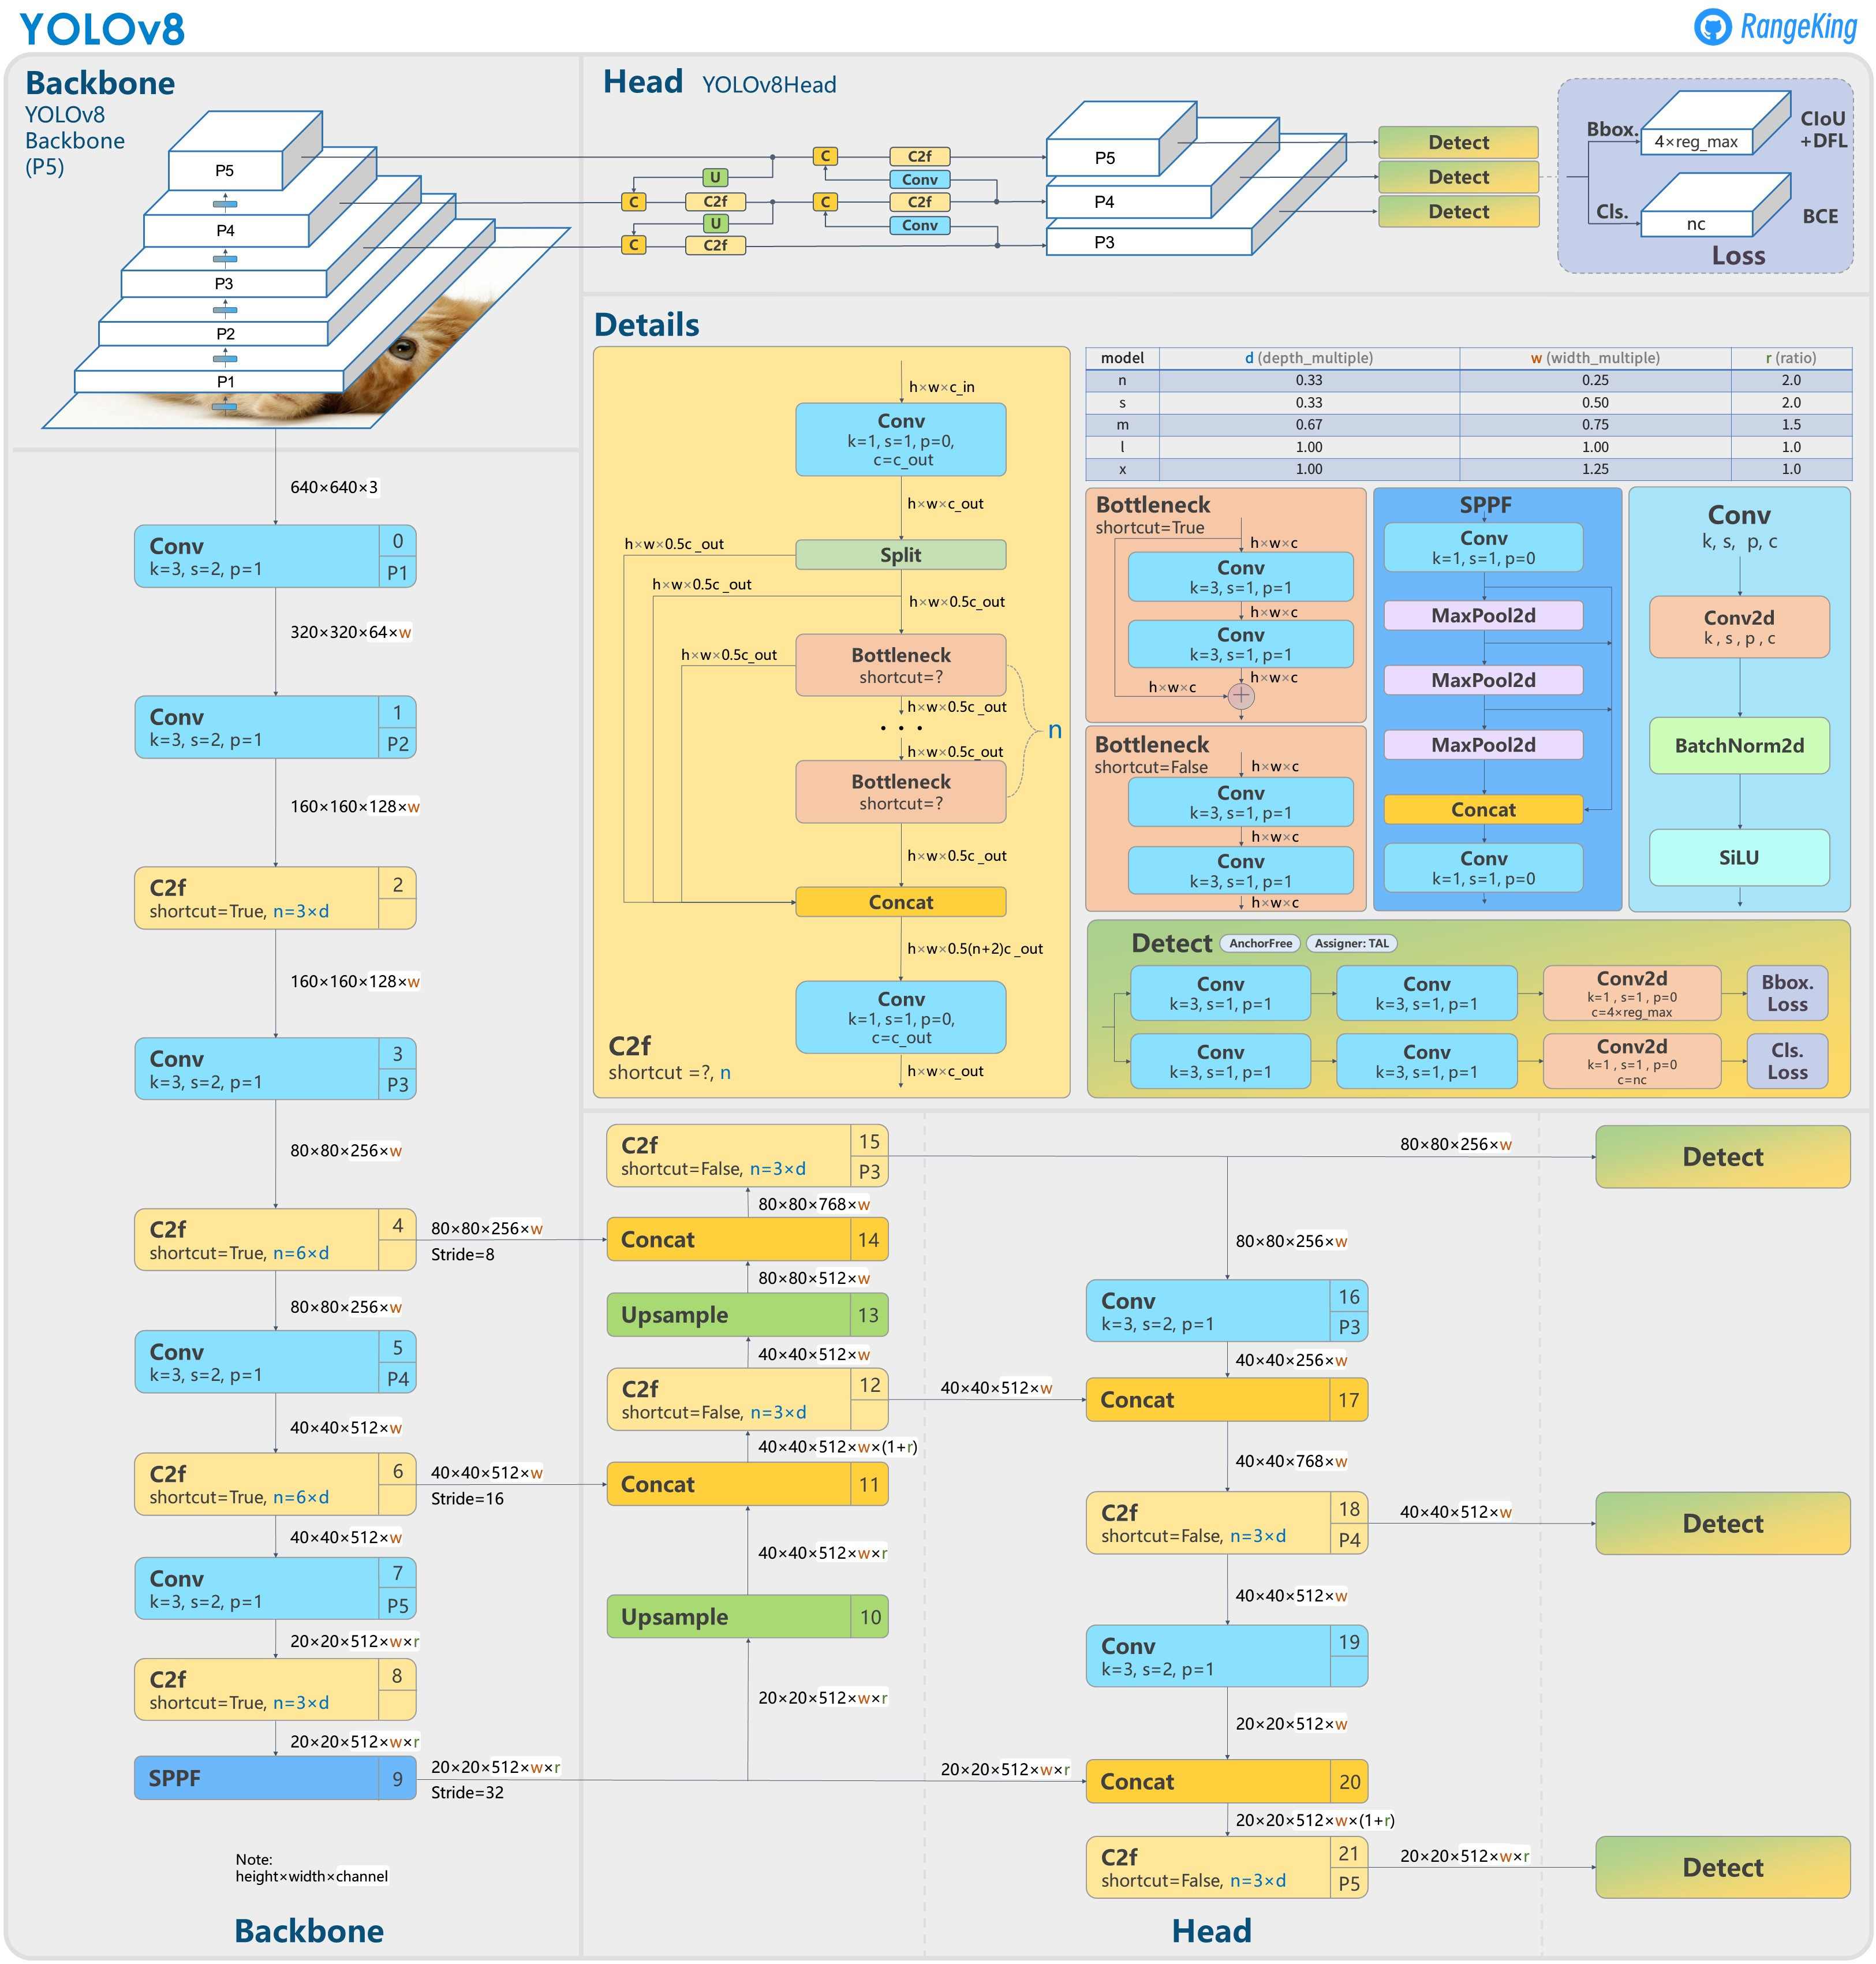 图1:YOLOv8 网络架构图,来源于 GitHub 用户 RangeKing
以 YOLOv8s 模型,1 个类别(class)的目标检测训练为例,以下为调用方法 train() 后的一个模型架构日志(输出示例 1),后面将对每个模块详细讲解。请参考附录配置文件对照了解。
                   from  n    params  module                                       arguments
  0                  -1  1       928  ultralytics.nn.modules.conv.Conv             [3, 32, 3, 2]
  1                  -1  1     18560  ultralytics.nn.modules.conv.Conv             [32, 64, 3, 2]
  2                  -1  1     29056  ultralytics.nn.modules.block.C2f             [64, 64, 1, True]
  3                  -1  1     73984  ultralytics.nn.modules.conv.Conv             [64, 128, 3, 2]
  4                  -1  2    197632  ultralytics.nn.modules.block.C2f             [128, 128, 2, True]
  5                  -1  1    295424  ultralytics.nn.modules.conv.Conv             [128, 256, 3, 2]
  6                  -1  2    788480  ultralytics.nn.modules.block.C2f             [256, 256, 2, True]
  7                  -1  1   1180672  ultralytics.nn.modules.conv.Conv             [256, 512, 3, 2]
  8                  -1  1   1838080  ultralytics.nn.modules.block.C2f             [512, 512, 1, True]
  9                  -1  1    656896  ultralytics.nn.modules.block.SPPF            [512, 512, 5]
 10                  -1  1         0  torch.nn.modules.upsampling.Upsample         [None, 2, 'nearest']
 11             [-1, 6]  1         0  ultralytics.nn.modules.conv.Concat           [1]
 12                  -1  1    591360  ultralytics.nn.modules.block.C2f             [768, 256, 1]
 13                  -1  1         0  torch.nn.modules.upsampling.Upsample         [None, 2, 'nearest']
 14             [-1, 4]  1         0  ultralytics.nn.modules.conv.Concat           [1]
 15                  -1  1    148224  ultralytics.nn.modules.block.C2f             [384, 128, 1]
 16                  -1  1    147712  ultralytics.nn.modules.conv.Conv             [128, 128, 3, 2]
 17            [-1, 12]  1         0  ultralytics.nn.modules.conv.Concat           [1]
 18                  -1  1    493056  ultralytics.nn.modules.block.C2f             [384, 256, 1]
 19                  -1  1    590336  ultralytics.nn.modules.conv.Conv             [256, 256, 3, 2]
 20             [-1, 9]  1         0  ultralytics.nn.modules.conv.Concat           [1]
 21                  -1  1   1969152  ultralytics.nn.modules.block.C2f             [768, 512, 1]
 22        [15, 18, 21]  1   2116435  ultralytics.nn.modules.head.Detect           [1, [128, 256, 512]]
Model summary: 225 layers, 11135987 parameters, 11135971 gradients, 28.6 GFLOPs
YOLOv8 Backbone 整体
见图中第 0~9 层。分别为
- Conv + Conv + C2f
- Conv + C2f(对齐特征金字塔 P3)
- Conv + C2f(对齐特征金字塔 P4)
- Conv + C2f + SPPF(对齐特征金字塔 P5)
关于特征金字塔(Feature Pyramid Networks,FPN)的含义,请参考后面“FPN 网络骨架”、“PANet 网络骨架”章节。
YOLOv8 Head 整体
YOLOv8 Head 整体参考了 PAN 网络骨架(基于 FPN 发展而来)。参考架构图,FPN 的思想主要体现在 4~9 层和 10~15 层之间的关联关系。PANet 思想主要体现在 16~21 层的信息传递。
FPN 网络骨架(参考)
- 论文:Feature Pyramid Networks for Object Detection
(2016.12,Meta)
- 亮点:Top-down pathway,即将上层特征(深层网络,空间感较弱,但语义较强的特征)融合到浅层网络特征(空间感较强,但语义较少的特征)中。
FPN 的架构图如下:
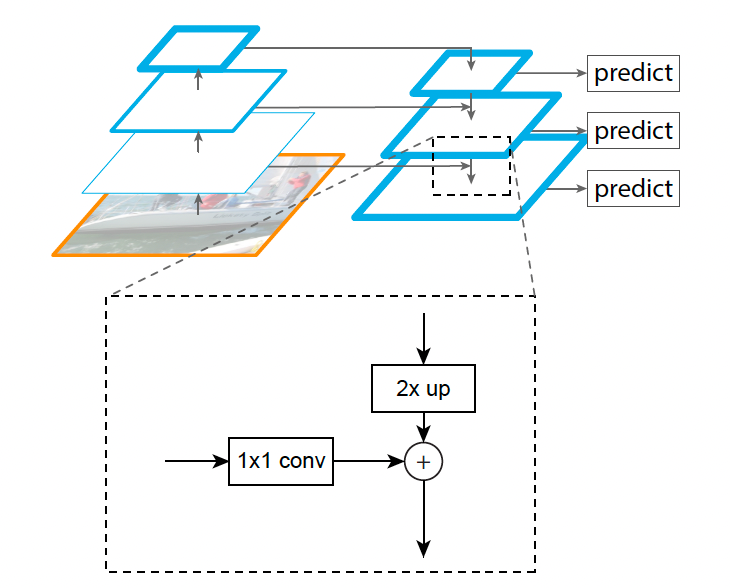 Figure 3. A building block illustrating the lateral connection and the top-down pathway, merged by addition.
PANet 网络骨架(参考)
PANet 为 FPN 的改进版本。
- 论文:Path Aggregation Network for Instance Segmentation
(2018.03,香港中文大学)
- 主要贡献点(YOLOv8用到的):引入自下而上的路径,将网络浅层的较准确的位置信号传递、融合到深层的特征中。
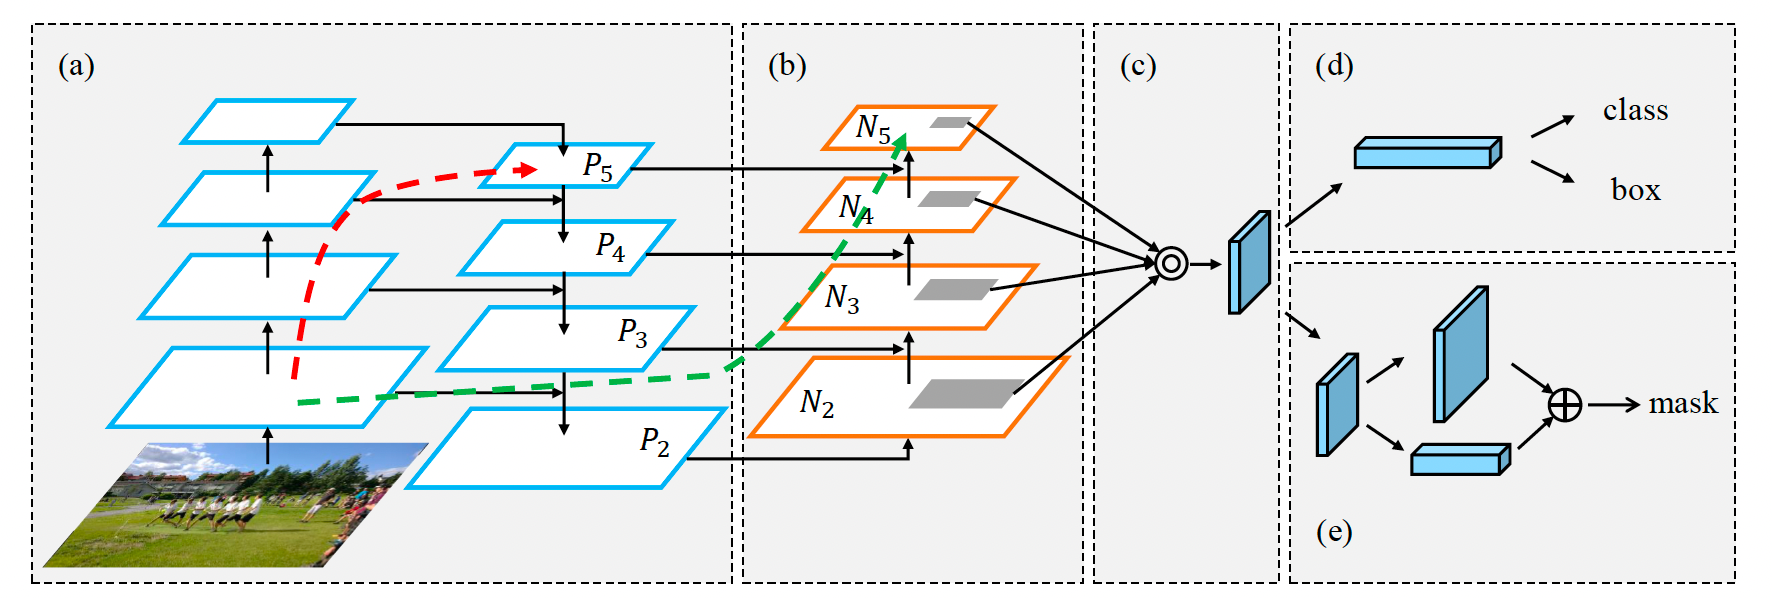 Figure 1. Illustration of our framework. (a) FPN backbone. (b) Bottom-up path augmentation. (c) Adaptive feature pooling. (d) Box branch. (e) Fully-connected fusion.
主要网络组件
Conv
标准的卷积操作,先后执行如下操作:
- 二维卷积(nn.Conv2d),更多了解卷积神经网络,建议参考视频:李宏毅教授讲授的卷积神经网络,论文:A guide to convolution arithmetic for deep learning
(2016.03,Vincent Dumoulin) 。
- 上面的架构图中,k(kernel)指卷积核大小
- s(stride)为步幅
- p(padding)为填充标记。
- c2(卷积核数量,即输出通道数量)。根据模型大小设定不同,对应不同的乘数,见架构图中右上表格 width_multiple 栏。例如,第一个卷积层,图中标示为 320 x 320 x 64 x
w,对于 s 模型,w=0.5,故最终的卷积核数量为 32(示例输出 1 中 arguments 的第 2 个参数)。
- 批归一化(nn.BatchNorm2d)
- 激活函数(默认为 nn.SiLU)
#  来源文件 ultralytics/ultralytics/nn/modules/conv.py
import torch.nn as nn

class Conv(nn.Module):
    """Standard convolution with args(ch_in, ch_out, kernel, stride, padding, groups, dilation, activation)."""
    default_act = nn.SiLU()  # default activation

    def __init__(self, c1, c2, k=1, s=1, p=None, g=1, d=1, act=True):
        """Initialize Conv layer with given arguments including activation.
        主要参数:c1 输入通道数;c2 输出通道数,即卷积核数量;k1 卷积核大小;s 步幅。"""
        super().__init__()
        self.conv = nn.Conv2d(c1, c2, k, s, autopad(k, p, d), groups=g, dilation=d, bias=False)
        self.bn = nn.BatchNorm2d(c2)
        self.act = self.default_act if act is True else act if isinstance(act, nn.Module) else nn.Identity()

    def forward(self, x):
        """Apply convolution, batch normalization and activation to input tensor."""
        return self.act(self.bn(self.conv(x)))

    def forward_fuse(self, x):
        """Perform transposed convolution of 2D data."""
        return self.act(self.conv(x))
注:YOLOv8 中 tensor 类型的数据结构和 torch.nn.Conv2d 相同,均为 , 为批大小, 为通道数, 为宽度, 为宽度。后续代码示例有很多基于维度 1(通道)操作。
Bottleneck
见架构图中部的分图 Bottleneck,结构非常简单,为两个卷积层 Conv,另加一个是否为残差网络的标记(shortcut),该标记体现在输出示例 1 中 C2f 的第四个参数。
#  来源文件 ultralytics/ultralytics/nn/modules/block.py
import torch.nn as nn

class Bottleneck(nn.Module):
    """Standard bottleneck."""

    def __init__(self, c1, c2, shortcut=True, g=1, k=(3, 3), e=0.5):
        """Initializes a bottleneck module with given input/output channels, shortcut option, group, kernels, and
        expansion.
        """
        super().__init__()
        c_ = int(c2 * e)  # hidden channels
        self.cv1 = Conv(c1, c_, k[0], 1)
        self.cv2 = Conv(c_, c2, k[1], 1, g=g)
        self.add = shortcut and c1 == c2

    def forward(self, x):
        """'forward()' applies the YOLO FPN to input data."""
        return x + self.cv2(self.cv1(x)) if self.add else self.cv2(self.cv1(x))
CSPNet(参考)
CSPNet 的主要思想是将基础层的特征按照通道分成两部分(后面 C2f 使用了类似思想),其中一部分走DenseNet+转换层,和另一个部分合并后再走转化层。如下图。
 Figure 2: Illustrations of (a) DenseNet and (b) our proposed Cross Stage Partial DenseNet (CSPDenseNet). CSPNet separates feature map of the base layer into two part, one part will go through a dense block and a transition layer; the other one part is then combined with transmitted feature map to the next stage.
【摘自 YOLOv7 论文】As for real-time object detectors that can be used on CPU, their design is mostly based on MobileNet, ShuffleNet, or GhostNet. Another mainstream real-time object detectors are developed for GPU, they mostly use ResNet, DarkNet, or DLA, and then use the CSPNet strategy to optimize the architecture.
MobileNet 的优化主要适用 CPU,CSPNet(Cross Stage Partial Network)的优化同时适用移动 GPU 和 CPU。
参考:
- CSPNet: A New Backbone that can Enhance Learning Capability of CNN
(2019.11,中国台湾“中研院”)
- MobileNets: Efficient convolutional neural networks for mobile vision applications
(2017.04,谷歌)
- MobileNetV2: Inverted Residuals and Linear Bottlenecks
- Searching for MobileNetV3
(2019.05,谷歌)
C2f
下面介绍 YOLOv8 的 C2f。其组成见架构图中中部的分图。C2f 的实现和标准的 CSPNet 不同,中间步骤没有连接操作。C2f 主要包括:
- 1 个 1 x 1 的 Conv 层
- n 个 Bottleneck 层,其中有 shortcut 参数。
- 连接后的 Conv 层
以 YOLOv8s,图片大小为 为例,参考架构图和示例输出 1 知,第 4 层的输入为 80 x 80 x 128,,该层依次执行:
- 做一次 Conv,输出为 80 x 80 x 128
- 基于通道数 128,分成两部分,y 数组为 y0,y1,维度都为 80 x 80 x 64
- 对 y1 做一次 Bottleneck(输入输出的通道数量不变),其输出 y2 追加到数组后,y 数组为 y0,y1,y2
- 对 y2 再(因为 n=2)做一次 Bottleneck,y 数组为 y0,y1,y2,y3。维度都为 80 x 80 x 64
- 将 y 数组基于通道维度做连接,变为 80 x 80 x 256,其中 256 来源于 64 x (n+2)
- 将上面连接后的输出,做一次 Conv,降维成 80 x 80 x 128
#  来源文件 ultralytics/ultralytics/nn/modules/block.py
import torch
import torch.nn as nn

class C2f(nn.Module):
    """Faster Implementation of CSP Bottleneck with 2 convolutions."""

    def __init__(self, c1, c2, n=1, shortcut=False, g=1, e=0.5):
        """Initialize CSP bottleneck layer with two convolutions with arguments ch_in, ch_out, number, shortcut, groups,
        expansion.
        主要参数:c1 输入通道数;c2 输出通道数;n Bottleneck 数量;shortcut 是否残差连接的标记。
        """
        super().__init__()
        self.c = int(c2 * e)  # hidden channels
        self.cv1 = Conv(c1, 2 * self.c, 1, 1)
        self.cv2 = Conv((2 + n) * self.c, c2, 1)  # optional act=FReLU(c2)
        self.m = nn.ModuleList(Bottleneck(self.c, self.c, shortcut, g, k=((3, 3), (3, 3)), e=1.0) for _ in range(n))

    def forward(self, x):
        """Forward pass through C2f layer."""
        y = list(self.cv1(x).chunk(2, 1)) # 卷积后,将输出分成两部分(按照通道维度)
        # 备注:第 k+1 次 Bottleneck 操作,仅对当前列表的最后一项操作(即第 k 次的输出),没有连接,不同于标准的 CSPDenseNet。
        y.extend(m(y[-1]) for m in self.m) # 将列表的最后一项持续 n 次 Bottleneck 操作。
        return self.cv2(torch.cat(y, 1)) # 将列表全部连接后(按照通道维度),再做一次卷积。

    def forward_split(self, x):
        """Forward pass using split() instead of chunk()."""
        y = list(self.cv1(x).split((self.c, self.c), 1))
        y.extend(m(y[-1]) for m in self.m)
        return self.cv2(torch.cat(y, 1))
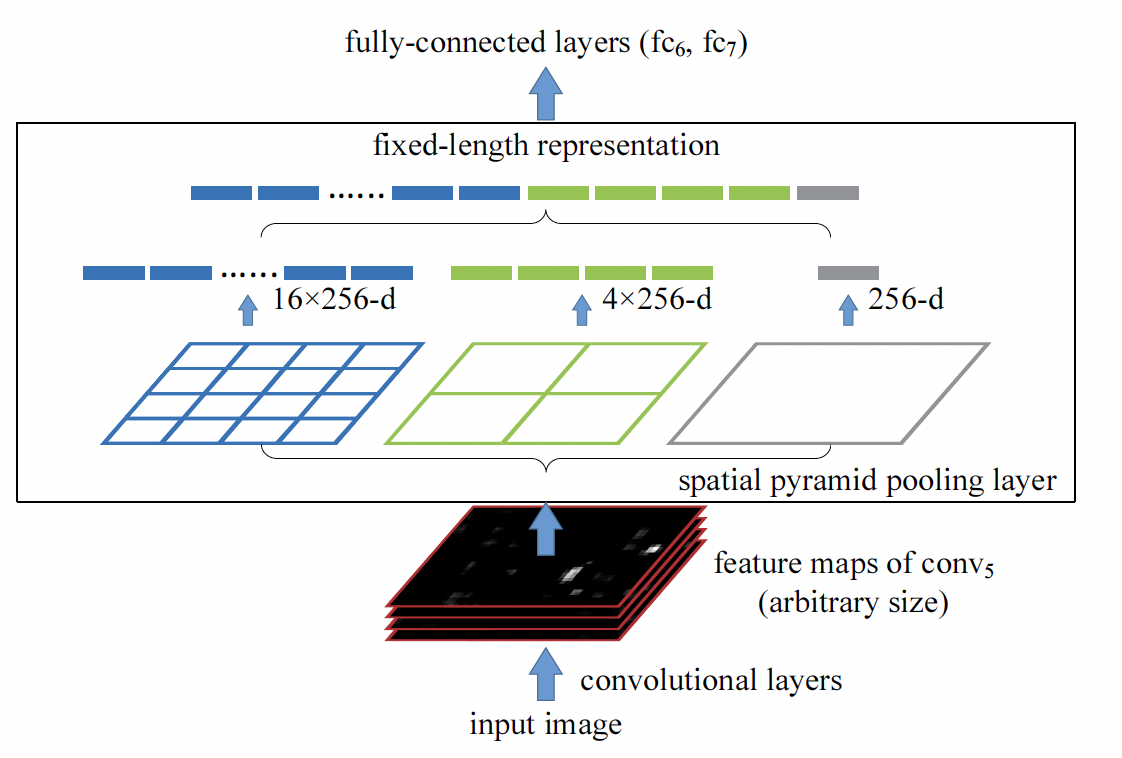
SPPF
SPP 论文:Spatial Pyramid Pooling in Deep Convolutional Networks for Visual Recognition (2014.06, )
Spatial Pyramid Pooling(空间金字塔池化)通过在特征图上执行不同大小的池化操作,并将结果进行整合,从而得到固定尺寸的输出。这种技术可以有效地处理尺寸变化多样的目标,从而提高了神经网络的泛化能力和鲁棒性。
看代码,YOLOv8 的 SPPF(Spatial Pyramid Pooling - Fast)不是为了得到一个固定大小的表示层,而为了在不同大小尺寸做 Pooling。具体过程为:
- 用 1x1 Conv 降维到一半的大小
- 分别用 kernel 为 5 做三次 nn.MaxPool2d。加上本身,连接。yolov5 issue
对这个实现有疑问。 - 将连接后的降维到输出层通道数。
#  来源文件 ultralytics/ultralytics/nn/modules/block.py
import torch
import torch.nn as nn

class SPPF(nn.Module):
    """Spatial Pyramid Pooling - Fast (SPPF) layer for YOLOv5 by Glenn Jocher."""

    def __init__(self, c1, c2, k=5):
        """
        Initializes the SPPF layer with given input/output channels and kernel size.

        This module is equivalent to SPP(k=(5, 9, 13)).
        """
        super().__init__()
        c_ = c1 // 2  # hidden channels
        self.cv1 = Conv(c1, c_, 1, 1)
        self.cv2 = Conv(c_ * 4, c2, 1, 1)
        self.m = nn.MaxPool2d(kernel_size=k, stride=1, padding=k // 2)

    def forward(self, x):
        """Forward pass through Ghost Convolution block."""
        x = self.cv1(x)
        y1 = self.m(x)
        y2 = self.m(y1)
        return self.cv2(torch.cat((x, y1, y2, self.m(y2)), 1))
Detect Head
单个检测头的架构图的右中位置。每个检测头包含两个 Conv + Conv + nn.Conv2d 网络,分别预测框和分类。
所有检测头的代码示例见下。
输出示例 1 中包含 3 个检测头,3个输入分别来源为15,18,21层的输出,3个输入来源的通道数分别为([128, 256, 512]),只有 1 个类别。
22 [15, 18, 21] 1 2116435 ultralytics.nn.modules.head.Detect [1, [128, 256, 512]]
# 来源文件:ultralytics/ultralytics/nn/modules/head.py
import torch
import torch.nn as nn

class Detect(nn.Module):
    """YOLOv8 Detect head for detection models."""
    dynamic = False  # force grid reconstruction
    shape = None
    anchors = torch.empty(0)  # init
    strides = torch.empty(0)  # init

    def __init__(self, nc=80, ch=()):
        """Initializes the YOLOv8 detection layer with specified number of classes and channels."""
        super().__init__()
        self.nc = nc  # number of classes
        self.nl = len(ch)  # number of detection layers
        self.reg_max = 16  # DFL channels (ch[0] // 16 to scale 4/8/12/16/20 for n/s/m/l/x)
        self.no = nc + self.reg_max * 4  # number of outputs per anchor(每个锚点的输出:类别数量 + 定位框相对锚点的上下左右 4 个偏移量的 DFL 分布)
        self.stride = torch.zeros(self.nl)  # strides computed during build
        c2, c3 = max((16, ch[0] // 4, self.reg_max * 4)), max(ch[0], min(self.nc, 100))  # channels

        # cv2[0]的输出 shape(N, 4*reg_max, H, W)
        self.cv2 = nn.ModuleList(
            nn.Sequential(Conv(x, c2, 3), Conv(c2, c2, 3), nn.Conv2d(c2, 4 * self.reg_max, 1)) for x in ch)

        # cv3[0]的输出 shape(N, nc类别数量, H, W)
        self.cv3 = nn.ModuleList(nn.Sequential(Conv(x, c3, 3), Conv(c3, c3, 3), nn.Conv2d(c3, self.nc, 1)) for x in ch)
        self.dfl = DFL(self.reg_max) if self.reg_max > 1 else nn.Identity()

    def forward(self, x):
        """Concatenates and returns predicted bounding boxes and class probabilities.
        连接,返回预测的 bbox 和 class 概率"""
        shape = x[0].shape  # BCHW
        # 按照配置文件yolov8.yaml,Detect 的输入来自15,18,21层。x[0], x[1], x[2] 来自对应各层的输出
        # 以索引 0 为例,cv2[0], cv3[0] 处理 x[0],shape
        # 输出到 loss 函数的 x[0] 的 shape(N, 4*reg_max + nc, H, W)
        for i in range(self.nl):
            x[i] = torch.cat((self.cv2[i](x[i]), self.cv3[i](x[i])), 1) # 基于 channel 维度合并

        # 训练时,Detect::forward() 直接返回。该分支由 BaseModel::loss() 发起,之后会调用 BaseModel子类(如DetectionModel)的 criterion() 计算损失。
        if self.training:
            return x
        elif self.dynamic or self.shape != shape:
            # make_anchors:根据特征生成锚点
            self.anchors, self.strides = (x.transpose(0, 1) for x in make_anchors(x, self.stride, 0.5))
            self.shape = shape

        x_cat = torch.cat([xi.view(shape[0], self.no, -1) for xi in x], 2)
        box, cls = x_cat.split((self.reg_max * 4, self.nc), 1)
        # dist2bbox:转化为 bbox
        dbox = dist2bbox(self.dfl(box), self.anchors.unsqueeze(0), xywh=True, dim=1) * self.strides

        y = torch.cat((dbox, cls.sigmoid()), 1)
        return (y, x)
损失函数
IoU (Intersection over Union) 是目标检测任务中评估预测框与目标框(GT,Ground Truth)相对位置关系和大小的一种度量方法。请参考 IoU、GIoU、DIoU、CIoU 等目标检测损失函数:图示 + 代码。
参考 Focal Loss 详解:图示 + 数学原理 + 代码 理解损失函数中对易分类样本、困难样本的升降权。
Anchor Free 的技术方案
YOLOv8 的目标检测、实例分割等任务使用了 Anchor Free 的设计方案,请参考 YOLOv8 目标检测中的 Anchor-Free 机制。
后处理(NMS)
待后续讲解。
在线推理
待后续讲解。
附录
yolov8 网络结构配置文件
YOLOv8 的神经网络架构,可以通过其配置文件 ultralytics/cfg/models/v8/yolov8.yaml 了解。
backbone 和 head 部分的参数说明:
- from 表示该层的输入,其中 -1 表示上一层
- repeats 表示该层的网络组件重复多少次,需要乘以 scales 配置部分的 depth 系数。例如,对于 s 模型,depth 为 0.33,backbone 第 5 层 repeats 的值为 6,故 YOLOv8s 第 6 层 C2f 的最终重复次数为 2,和日志文件的一致。
- module 为类名,对于 pytorch 中已有的,会加上 nn 字样,例如 nn.Upsample。
- args 为初始化时的参数。
# Ultralytics YOLO 🚀, AGPL-3.0 license
# YOLOv8 object detection model with P3-P5 outputs. For Usage examples see https://docs.ultralytics.com/tasks/detect

# Parameters
nc: 80  # number of classes
scales: # model compound scaling constants, i.e. 'model=yolov8n.yaml' will call yolov8.yaml with scale 'n'
  # [depth, width, max_channels]
  n: [0.33, 0.25, 1024]  # YOLOv8n summary: 225 layers,  3157200 parameters,  3157184 gradients,   8.9 GFLOPs
  s: [0.33, 0.50, 1024]  # YOLOv8s summary: 225 layers, 11166560 parameters, 11166544 gradients,  28.8 GFLOPs
  m: [0.67, 0.75, 768]   # YOLOv8m summary: 295 layers, 25902640 parameters, 25902624 gradients,  79.3 GFLOPs
  l: [1.00, 1.00, 512]   # YOLOv8l summary: 365 layers, 43691520 parameters, 43691504 gradients, 165.7 GFLOPs
  x: [1.00, 1.25, 512]   # YOLOv8x summary: 365 layers, 68229648 parameters, 68229632 gradients, 258.5 GFLOPs

# YOLOv8.0n backbone
backbone:
  # [from, repeats, module, args]
  - [-1, 1, Conv, [64, 3, 2]]  # 0-P1/2
  - [-1, 1, Conv, [128, 3, 2]]  # 1-P2/4
  - [-1, 3, C2f, [128, True]]
  - [-1, 1, Conv, [256, 3, 2]]  # 3-P3/8
  - [-1, 6, C2f, [256, True]]
  - [-1, 1, Conv, [512, 3, 2]]  # 5-P4/16
  - [-1, 6, C2f, [512, True]]
  - [-1, 1, Conv, [1024, 3, 2]]  # 7-P5/32
  - [-1, 3, C2f, [1024, True]]
  - [-1, 1, SPPF, [1024, 5]]  # 9

# YOLOv8.0n head
head:
  - [-1, 1, nn.Upsample, [None, 2, 'nearest']]
  - [[-1, 6], 1, Concat, [1]]  # cat backbone P4
  - [-1, 3, C2f, [512]]  # 12

  - [-1, 1, nn.Upsample, [None, 2, 'nearest']]
  - [[-1, 4], 1, Concat, [1]]  # cat backbone P3
  - [-1, 3, C2f, [256]]  # 15 (P3/8-small)

  - [-1, 1, Conv, [256, 3, 2]]
  - [[-1, 12], 1, Concat, [1]]  # cat head P4
  - [-1, 3, C2f, [512]]  # 18 (P4/16-medium)

  - [-1, 1, Conv, [512, 3, 2]]
  - [[-1, 9], 1, Concat, [1]]  # cat head P5
  - [-1, 3, C2f, [1024]]  # 21 (P5/32-large)

  - [[15, 18, 21], 1, Detect, [nc]]  # Detect(P3, P4, P5)
后续 YOLO 系列进展
YOLO 系列目前还是科研热点之一,YOLOv8 后的主要论文如下:
- YOLOv10
- 论文:YOLOv10: Real-Time End-to-End Object Detection
(2024.05,清华大学)
代码:THU-MIG/yolov10
- 论文:YOLOv10: Real-Time End-to-End Object Detection
- YOLOv9
- 论文:YOLOv9: Learning What You Want to Learn Using Programmable Gradient Information
(2024.04,台湾省“中研院”等)
代码:WongKinYiu/yolov9
- 论文:YOLOv9: Learning What You Want to Learn Using Programmable Gradient Information


发布于:2023-11-17 10:18:58 最后更新:2024-05-27 10:28:09 描述有误?我来纠错